

Blog using Jekyll | Github Pages with custom domain
14 Apr 2019This post talks about how you can setup a blog using Jekyll and host it using GitHub. Jekyll offers simple and blog-aware, static site generation. Jekyll takes your content, renders Markdown and Liquid templates, and spits out a complete, static website ready to be served by Apache, Nginx or another web server.
First you have to cerate a layout for your pages. Consider it as a template. For example all your posts can have one template. Then your home page and about page have a different template. Then all contents, you can write in a markdown format (you can also use HTML). If you want to create a post, you write it in a plain text using markdown and then save those in /_posts folder. You will specify which layout to use in this file. Then you compile your site using Jekyll. Jekyll will automatically create HTML files and folder structure for you. You can create layouts and templates so that Jekyll will automatically create pagination, organize your posts based on tags, etc. Once you have your setup, then it is pretty straight forward and easy to maintain.
GitHub supports hosting web contents on GitHub. If you have a repository, then
you can create a folder called Docs and upload all your html files in it.
After enabling GitHub pages, you can browse to
https://<username>.github.io/repository. If the repository name itself is
<username>.github.io, then you can host your html files in the root folder
and it will be available at https://<username>.github.io/.
GitHub also supports Jekyll directly. This means you do not need to compile and then upload HTML files to your repository. GitHub will do that for you. One disadvantage of this is that, GitHub only supports a handful of Jekyll plug-ins. If you are planning to customize your blog down to every detail, and need to include some fancy modifications, then better compile locally and host it on GitHub.
I started by hosting Jekyll files directly and let GitHub compiled for me.
Then I changed to uploading compiled HTML files directly to GitHub. The best
part is, if you have a custom domain, (like www.eionix.co.in) then you can point
this directly to your GitHub page. Now GitHub support HTTPS. This means even
if you don’t have an HTTPS certificate for you domain, GitHub will give one
for you completely free. Cool!!! So you can go to https://yourdomain.co.in
and GitHub will serve you the blog.
Creating Blog using Jekyll
Let’s start. Following instructions are for Ubuntu (Linux). If you are having a different distro or OS, refer Link. These steps were taken directly from Jekyll docs. For any queries, refer Link
sudo apt-get install ruby-full build-essential zlib1g-dev
echo '# Install Ruby Gems to ~/gems' >> ~/.bashrc
echo 'export GEM_HOME="$HOME/gems"' >> ~/.bashrc
echo 'export PATH="$HOME/gems/bin:$PATH"' >> ~/.bashrc
source ~/.bashrc
gem install jekyll bundler
Create your blog
jekyll new myblog
cd myblog
bundle exec jekyll serve
Your site is ready. Go to http://localhost:4000 and you can view your blog.
A complete Jekyll folder structure will look like this.
- /_draft
- /_includes
- /_layouts
- /_posts
- /_site
- /assets
- /404.html
- /about.md
- /_config.yml
- /Gemfile
- /Gemfile.lock
- /index.md
Create a file with following format YEAR-MONTH-DAY-title.MARKUP inside /_posts
cd /_posts
nano 2019-04-14-my-first-post.md
Type following contents to the file. For a complete reference of markdown, refer Markdown_Reference.
---
layout: post
author: eionix
---
my first post
Go to root folder and build it.
bundle exec jekyll serve
jekyll serve will automatically build if you have any changes (except
changes in _config.yml). In that case use bundle exec jekyll build
Export your old blog to Jekyll
If you are migrating from an existing framework like Google’s Blogger, you can directly convert your existing posts. First export your old blog into an xml file. If you were using Blogger, there is an option to export under blog settings. After exporting copy the xml file to the root folder and type this command.
ruby -r rubygems -e 'require "jekyll-import";
    JekyllImport::Importers::Blogger.run({
      "source"                => "/path/to/blog-MM-DD-YYYY.xml",
      "no-blogger-info"       => false, # not to leave blogger-URL info (id and old URL) in the front matter
      "replace-internal-link" => false, # replace internal links using the post_url liquid tag.
    })'
Mind you that, you may require to modify those files later. (can cause slight layout issues)
Hosting the site in GitHub
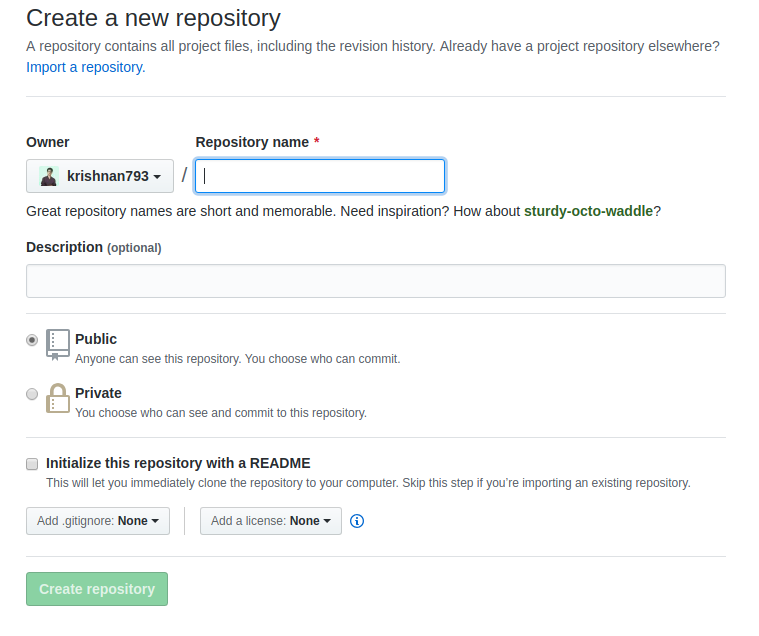
Now create a repository in GitHub with name <username>.github.io. Now git
init either root folder or _posts folder. If you init root folder github will
build your site for you. If you git init _sites folder, you are directly
uploading compiled files. If you are hosting compiled HTML files, run this
before uploading.
JEKYLL_ENV=production bundle exec jekyll serve
This will build HTML files for production environment.
git init
git add .
git commit -m "first commit"
git remote add origin https://github.com/<username>/<username.github.io>.git
git push -u origin master
You can now test your blog at https://<username.github.io>. It will take
some time to reflect the changes. If you upload root folder, github will now
compile that into html files. Otherwise the compiled files will be directly
available at the url.
Adding custom domain
Now if you have a custom domain like ‘www.yourdomain.co.in’, then you can
point this to your blog rather than https://<username.github.io>. Also you
can make it https://. So your blog url becomes
https://www.yourdomain.co.in.
Go to GitHub repository settings and add the custom domain.
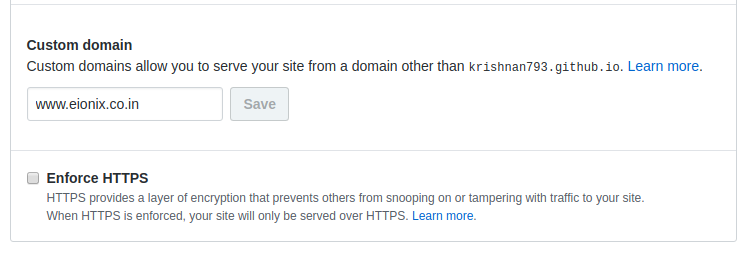
This will add a CNAME file at the root of your repository
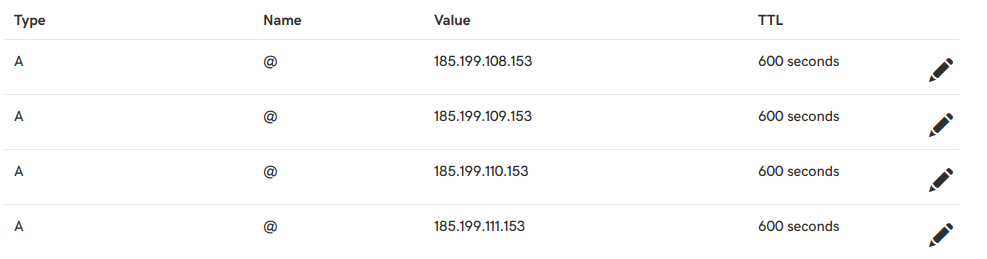
Now you need to update your DNS records to point to GitHub. GO to your domain registrar (like godaddy, etc) and change the DNS A record to following entries. Always refer this link https://help.github.com/en/articles/setting-up-an-apex-domain to make sure following are the updated DNS records.
- 185.199.108.153
- 185.199.109.153
- 185.199.110.153
- 185.199.111.153
Now add these CNAME records

Your blog will now be able to access using custom domain id
https://www.yourdomain.co.in. It will take some time to reflect the changes.
If you add /_posts as the GitHub repository root folder, you can create a
new repository at root level for your blogs source file. This will seperate
your blog into two repository. One will have source files which you can make
private and one with the build files.
Now you can advance and edit and customize layouts to suit your needs.
Happy blogging !!!